Importing from S3
Move your large files into XetHub for efficiently versioned storage with streaming access and guaranteed reproducibility.
Import from the XetHub UI
Evaluating XetHub as a S3 replacement? Import an existing S3 bucket to XetHub as a new repository and optionally sync updates from S3 on a regular cadence for easy side-by-side comparison.
-
Click the top right
+button in the XetHub UI and select the "Import from S3" option.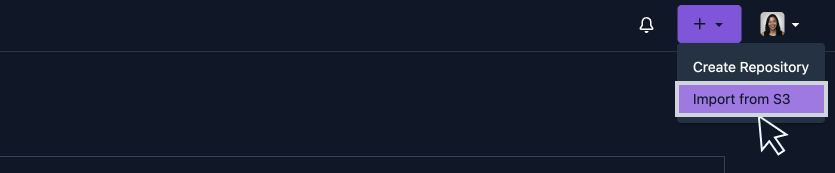
-
Configure your import.
-
The S3 bucket section covers important information and credentials:
-
Bucket and prefix: Fill in your S3 URL and any optional prefix to import into the new repository, e.g.
s3://myawsbucket/prefix/. -
AWS Access Key: Non-session AWS IAM access key to your bucket. The access key must have the following permissions:
s3:ListBucket,s3:GetObjectands3:GetBucketLocationnoteNon-session credentials are required because our S3 import operation may exceed the valid duration for session credentials.
-
AWS Secret Key: AWS secret access key associated with your access key
-
-
(Optional) Sync: Configure background sync processes to move data from your S3 bucket to the repository at specified frequency.
-
-
Name your repository and set its visibility, then click "Create Repository". XetHub will show each sync as new commits on the repository.
Manually trigger an S3 import
You can pick up changes from S3 by manually triggering a sync on the bucket. By default, xet sync will copy any files that have different sizes between the bucket and target repository. This is a good option if you know that there are changes to a bucket that you want to pick up immediately, prior to the next scheduled S3 import.
From your terminal, run the xet sync command, specifying the S3 bucket and repository to sync to.
xet sync s3://bucket/path/to/source xet://endpoint:user/repo/branch/path/to/target
Use our public xethub.com endpoint unless you're on a custom enterprise deployment.
When running xet sync, the changed files will stream through your local machine and back into XetHub. Depending on the source region of your S3 bucket, this can lead to unexpected data transfer fees.
Move files with awscli
Download and move your S3 files into XetHub with a few steps.
Create and clone a new XetHub repository
If you haven't already, create a new XetHub repository by clicking the + button in the top right navigation. Clone your new repository locally with the git xet clone command, found under the purple Access button.
Install awscli and move files
-
Install awscli on your local machine.
-
Configure awscli with the appropriate AWS credentials.
-
Move S3 data into your local clone.
cd <repo>
aws s3 cp s3://<my-bucket>/<my-folder> . --recursive
Add, commit, and push changes
-
Stage and commit new files:
git add *
git commit -m "Adding S3 files" -
Push files to the XetHub remote.
git push -
Navigate to the XetHub UI and find your XetHub repo. Confirm that all your expected code and data are there, along with their full commit history.
Move files with Xet CLI
Install the Xet CLI for easy move files from S3 to XetHub.